Smart Heater Contoller for an ESPresso machine
Making better espresso with Arduino
After the lockdown started, and my choice of coffee shops became severely limited, I went down the rabbit hole of making coffee at home. This culminated in acquiring a used Rancilio Silvia espresso machine, a mid-range consumer model with commercial-level output.
I made a video of my basic routine with it here:
 .
.
While regarded as one of the best in its price range, the Silvia has a significant issue with making consistently good coffee - its temperature control is highly variable. This has led to many people fitting 3rd party PID devices, a sort of complex, learning thermostat I’ll explain later. These work well but are pricey, at least £100, so I went to see what I could do with a microcontroller and a relay.
Why does temperature matter?
Making good coffee, in this case espresso, requires specific parameters to get the right level of extraction from the beans (under-extraction = sour, over-extraction = bitter). These parameters include dose, grind input:output ratio, extraction pressure, tamper pressure and more - but here I’m focussing on brew temperature. For most coffees this is around 93°C.
What’s wrong with the Rancilio Silvia’s thermostat?
This is what I wanted to first determine. How much variation was there in boiler temperature?
I went about this with the WiFi-equipped ESP8266 microcontroller (programmed via the Arduino IDE) connected to a K-type thermocouple (a temperature sensor designed for accurate readings at a wide range of temperatures) . I’d normally use a DS18B20 temperature sensor, but they max out around 100°C, so sadly it wouldn’t do.
I stuck the thermocouple against the boiler and wrote a basic script to publish a reading every 5 seconds to Grafana (using MQTT, via Node-Red and an Influx Database).
This provided the following over time:
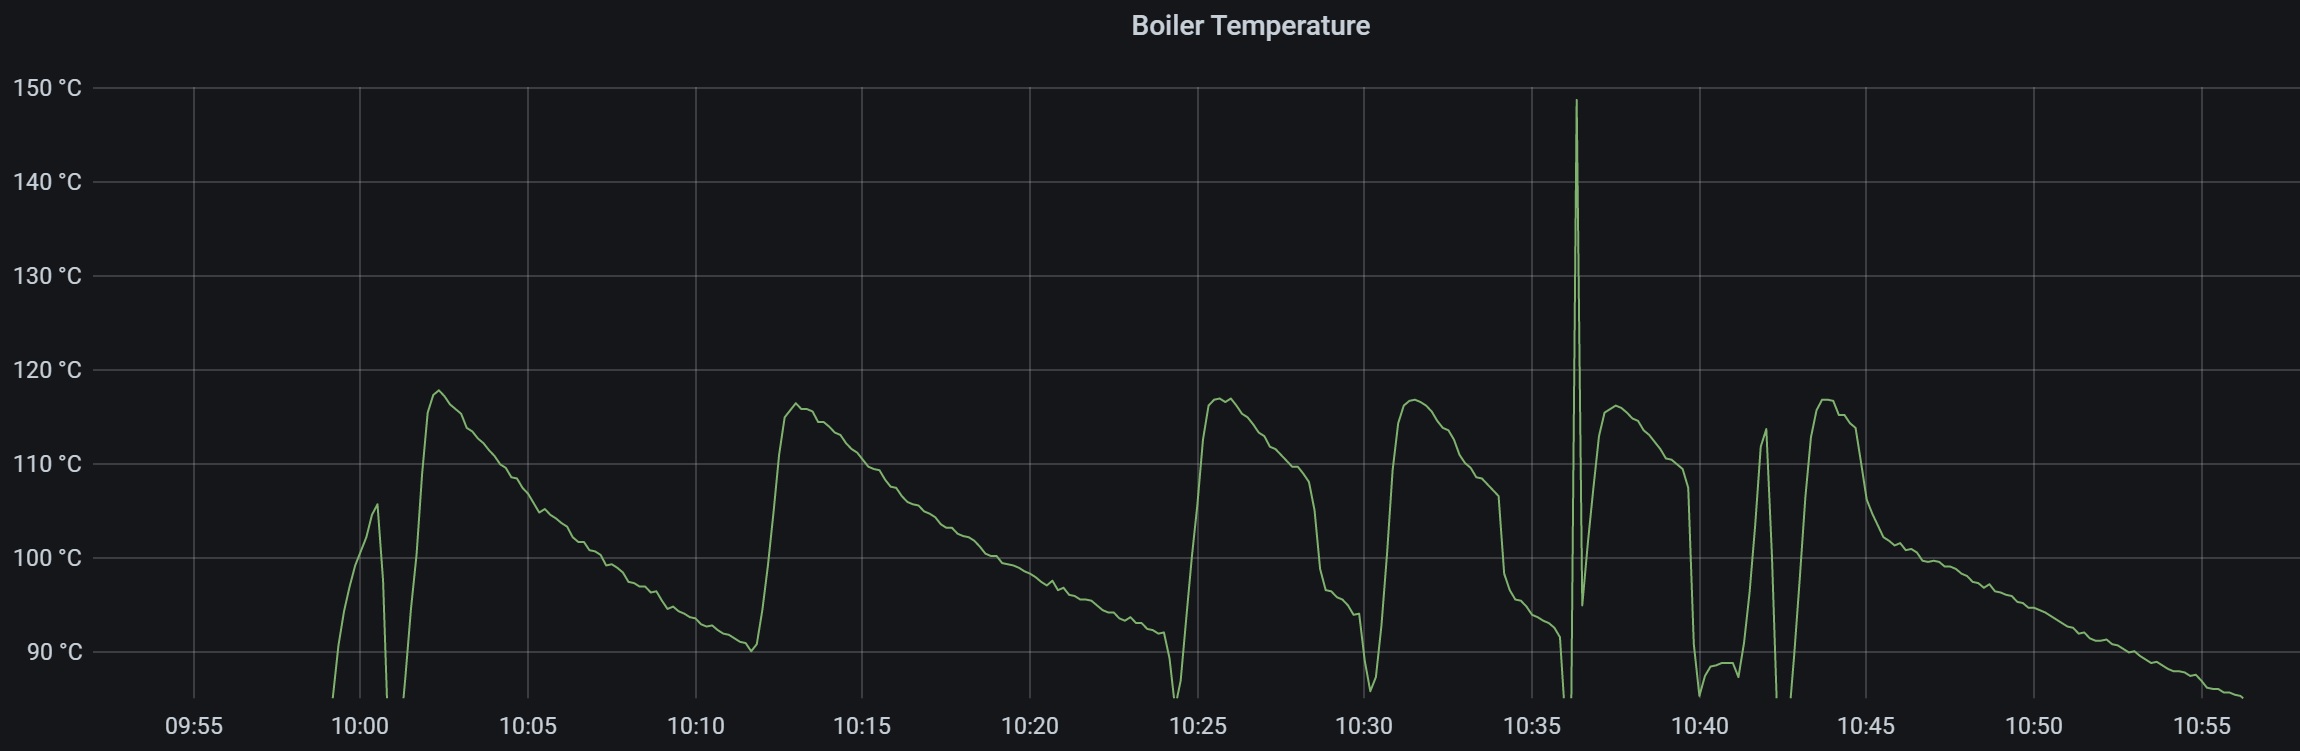
Immediately we can see the massive fluctuation around a set point of 85°C to 115°C (the large 150°C spike is steaming). This is the inbuilt thermostat clicking on when the temperature drops pretty low, and the heater then overshooting once the thermostat shuts off around 100°C. So we already see that if I make coffee at any point after the machine has warmed up, I could be brewing anywhere between 85°C and 115°C. This explains the hugely variable coffee shots users complain about with the Silvia, and resort to techniques such as ‘temp surfing’ - timing the extraction after the boiler clicks on.
What’s a PID controller?
A proportional–integral–derivative controller. This means pretty little on its own, but it’s essentially an equation that takes the current error rate (e.g. what the temperature is vs what it should be) and produce the necessary signal to correct this without overshooting. PID controllers are very common, most notably you get them in cruise control systems for cars as you can’t really afford to have the speed constantly oscillating around a set point.
They make perfect sense for a coffee machine, especially as the heating element has a fair amount of lag in its ability to heat and (stop heating ) water. The key concept for using PID in coffee is that you’re not outputting a specific value to a motor to spin at a different speed (cruise control), your outputting a value to be turned into what percentage of time you want your heater to be on - e.g. heat for 300ms for every 1s.
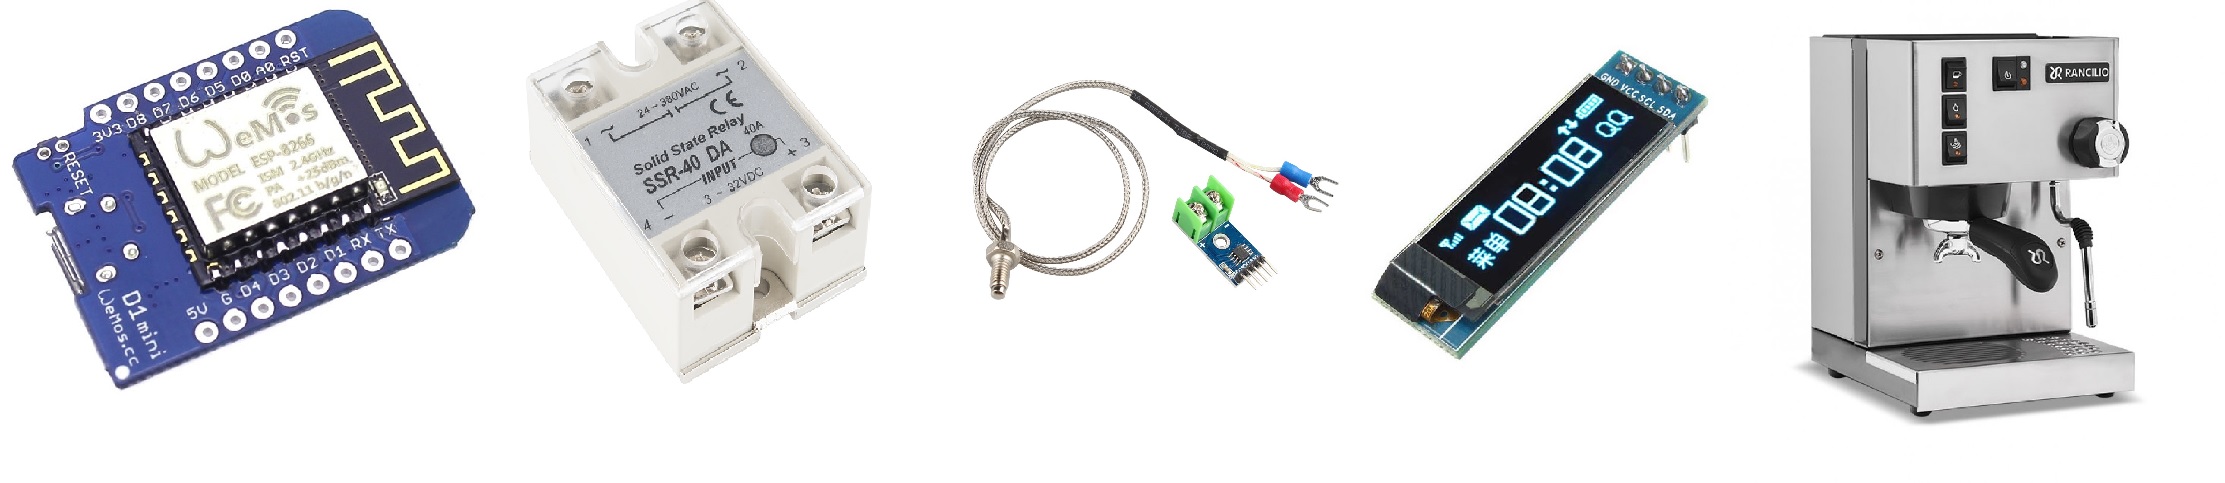
For a coffee machine, this translates to three simple components:
- A microcontroller to run the controller algorithm (ESP8266 in a Wemos D1 format)
- An input signal - the temperature sensor (K-type thermocouple with amplifier board)
- An output actuator - a way to turn the heater on/off (Solid state relay)
Assembly
Attaching the components is straightforward enough, but as always, don’t play with mains voltage if you do not know what you are doing. The coffee machine runs on the full 230V, no low voltage transformers here.
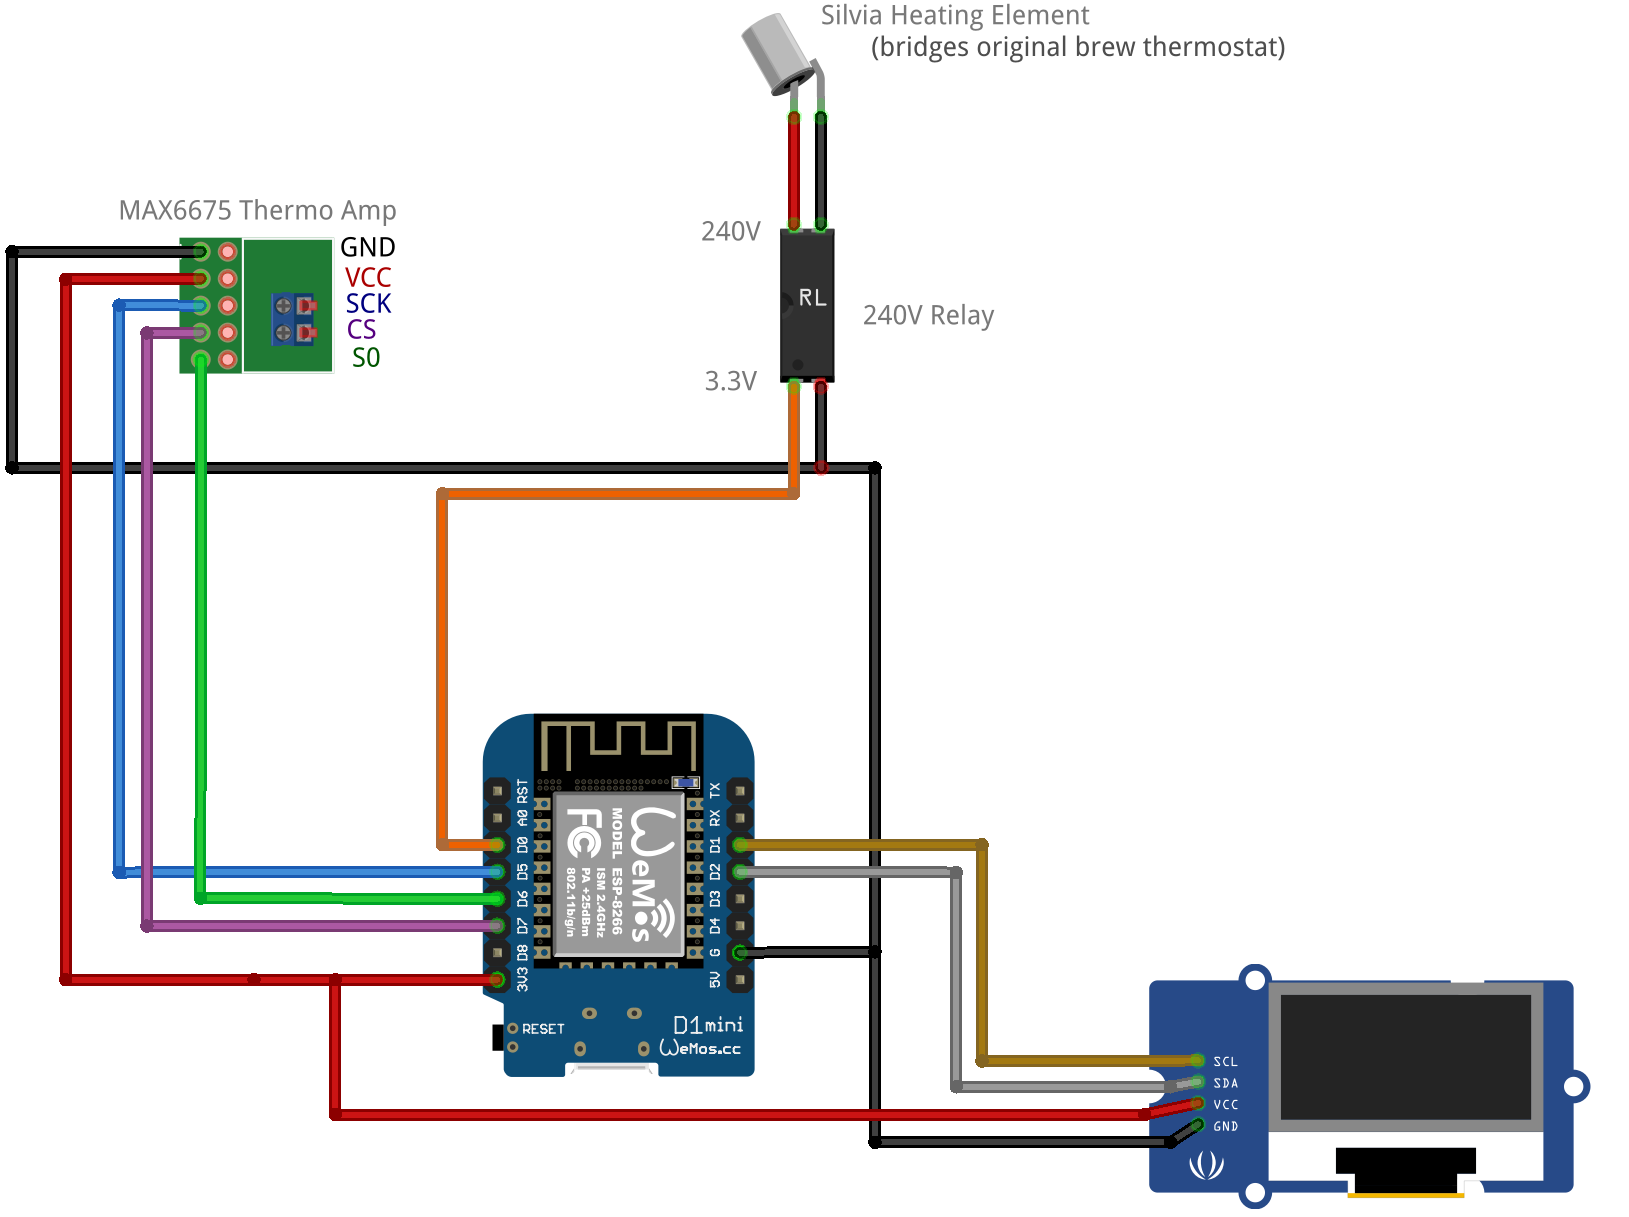
The wiring is as follows:
First, I needed the thermocouple to be as close to the boiler as possible to get an accurate temperature. I used one of the screw holes from the original limpet thermostat on the boiler to hold the tip in place, while spreading on some thermal paste to ‘unite’ boiler brass and thermocouple housing.
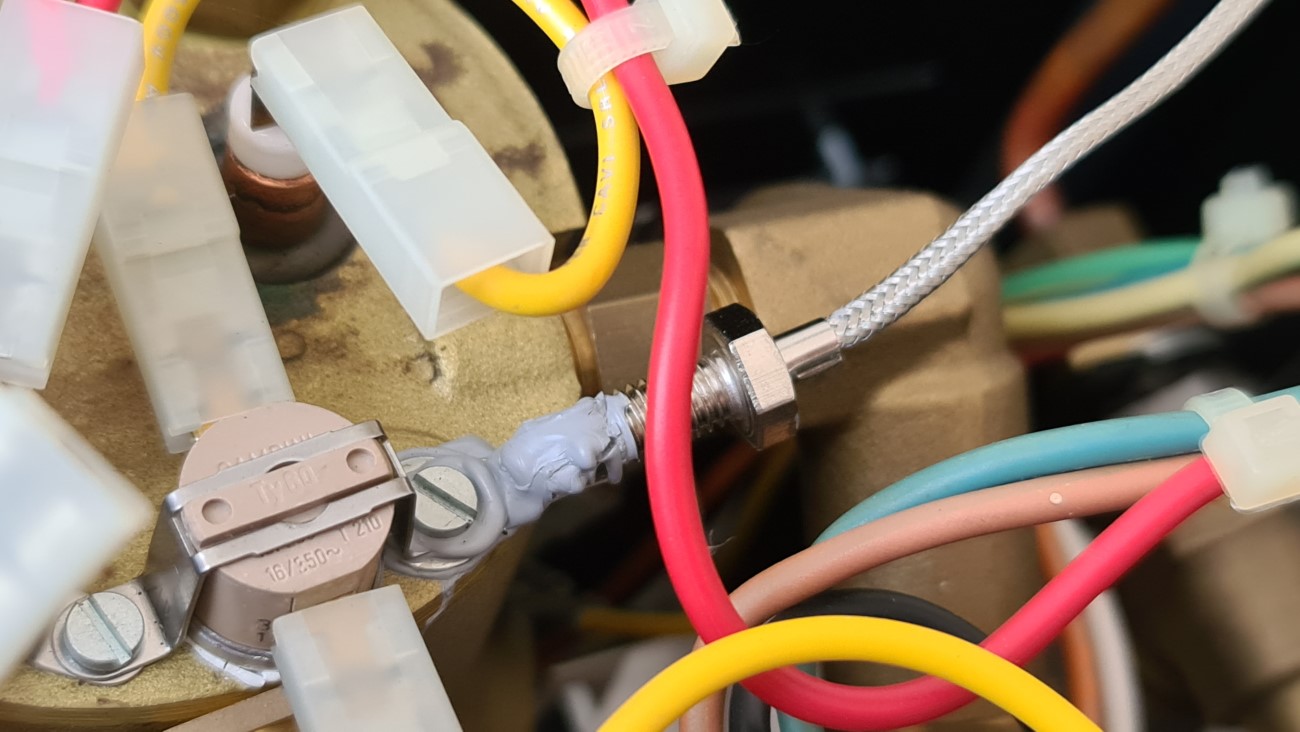 The thermocouple in place with lots of thermal compound
The relay essentially bridges the electrical gap where the thermostat originally sat. So instead of the thermostat completing the circuit to the heating element, we can directly do it from the ESP8266.
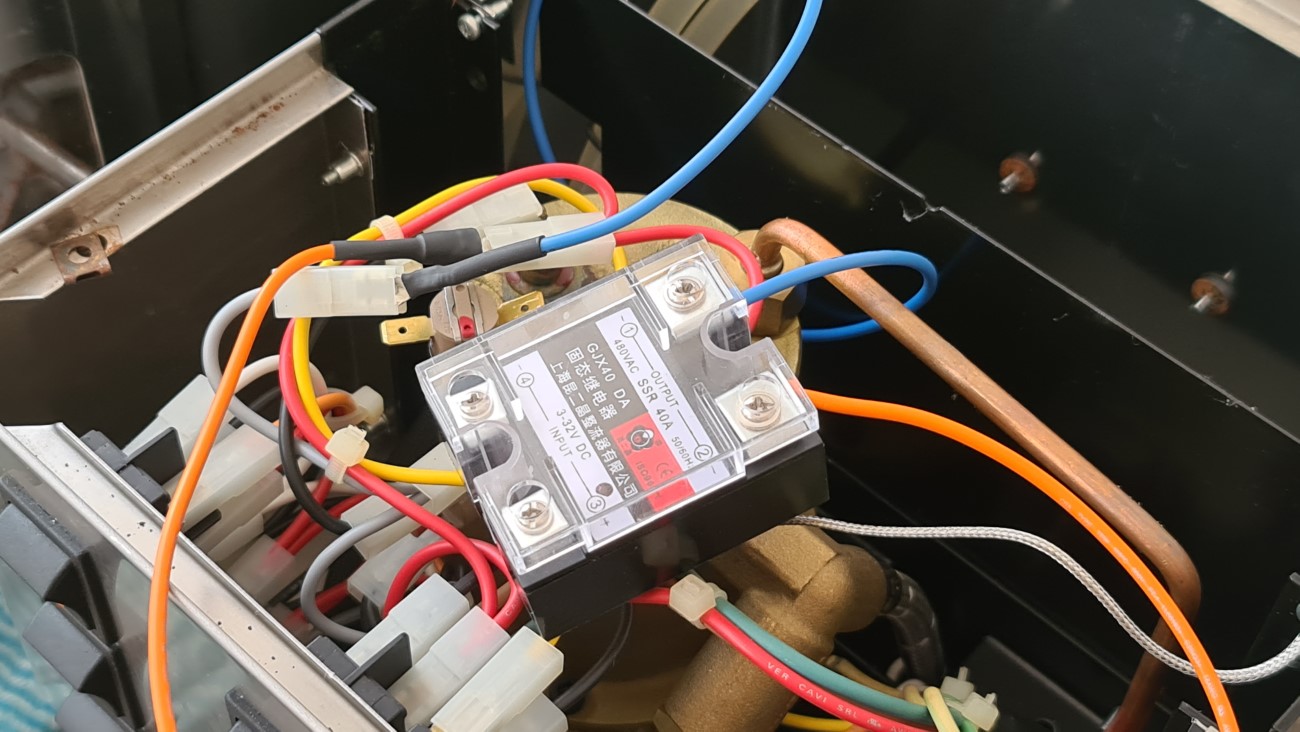 The relay temporarily in front of its connectors, bridging the grey, plastic connectors with its high voltage side (blue & orange wires)
I used a simple digital output to set the relay value and the thermocouple signal comes in via serial interface. A really basic thermostat could now be coded:
temperature = read.temp;
if (temperature < 93){
digitalWrite(relay_pin,HIGH);
else
digitalWrite(relay_pin,LOW);
}
At this point, the coffee machine boiler is also essentially ‘smart’ in that we have control of it via WiFi if we code in the MQTT client to receive messages to turn the relay on or publish the temperature readings.
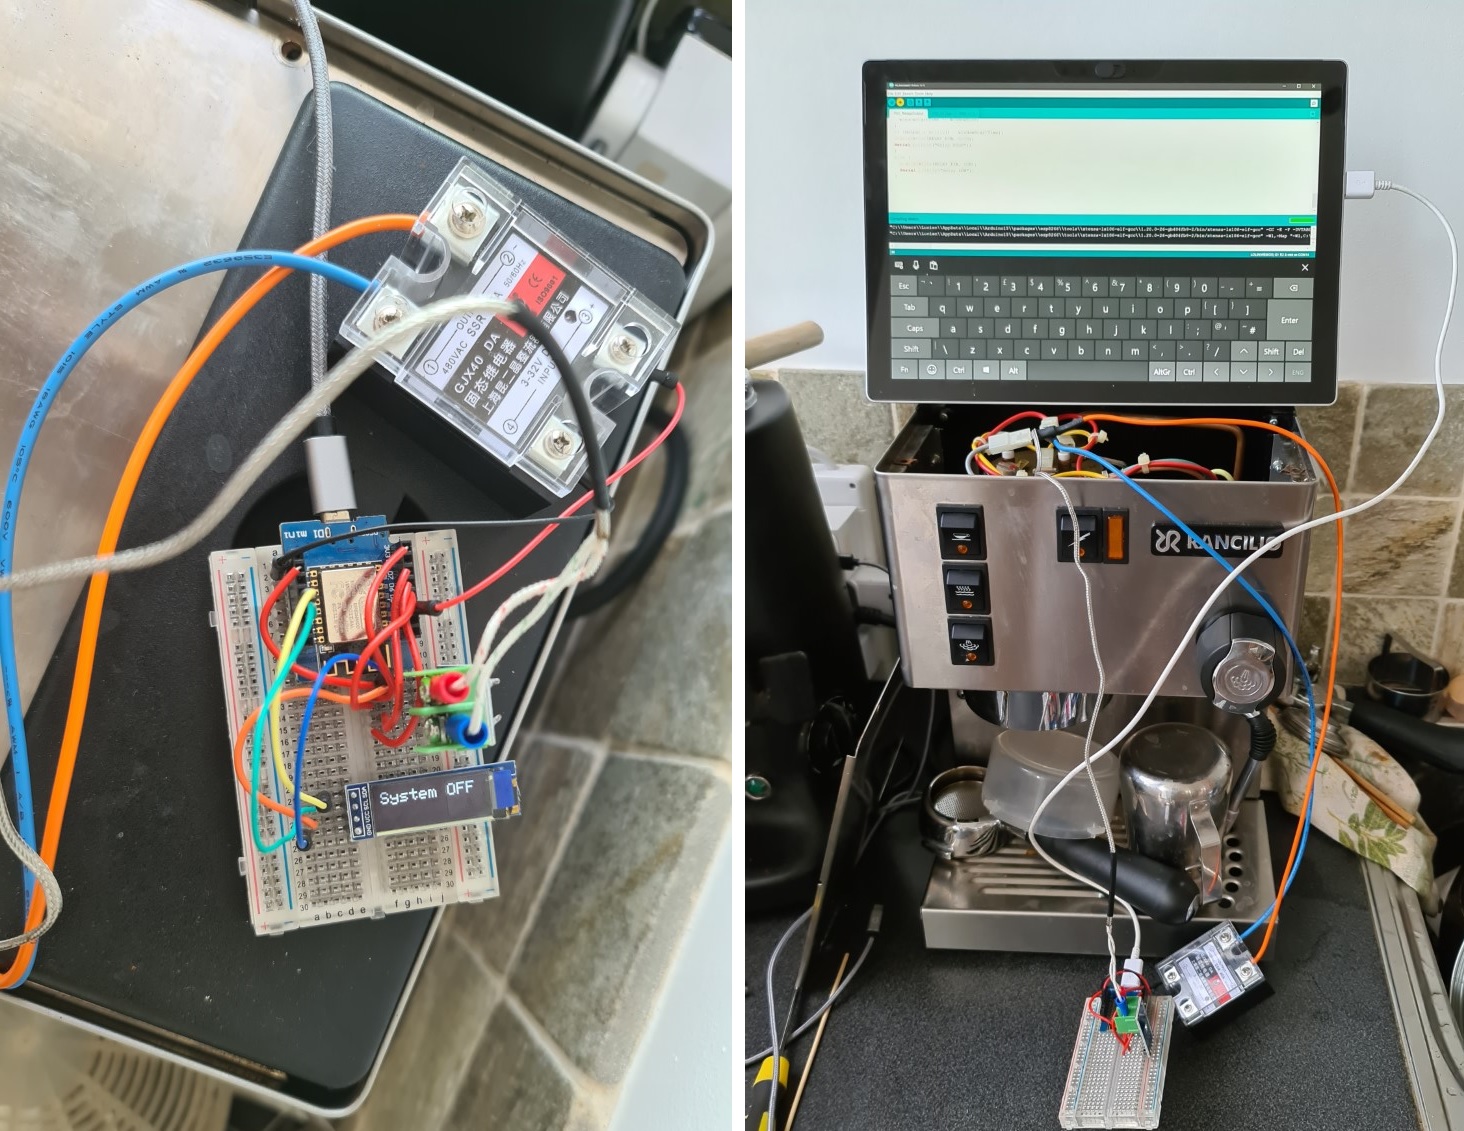
I stuck the relay on the back of the Silvia for now, but this could be internalised as there’s plenty of space and this would ensure mains voltage stayed inside the coffee machine itself.
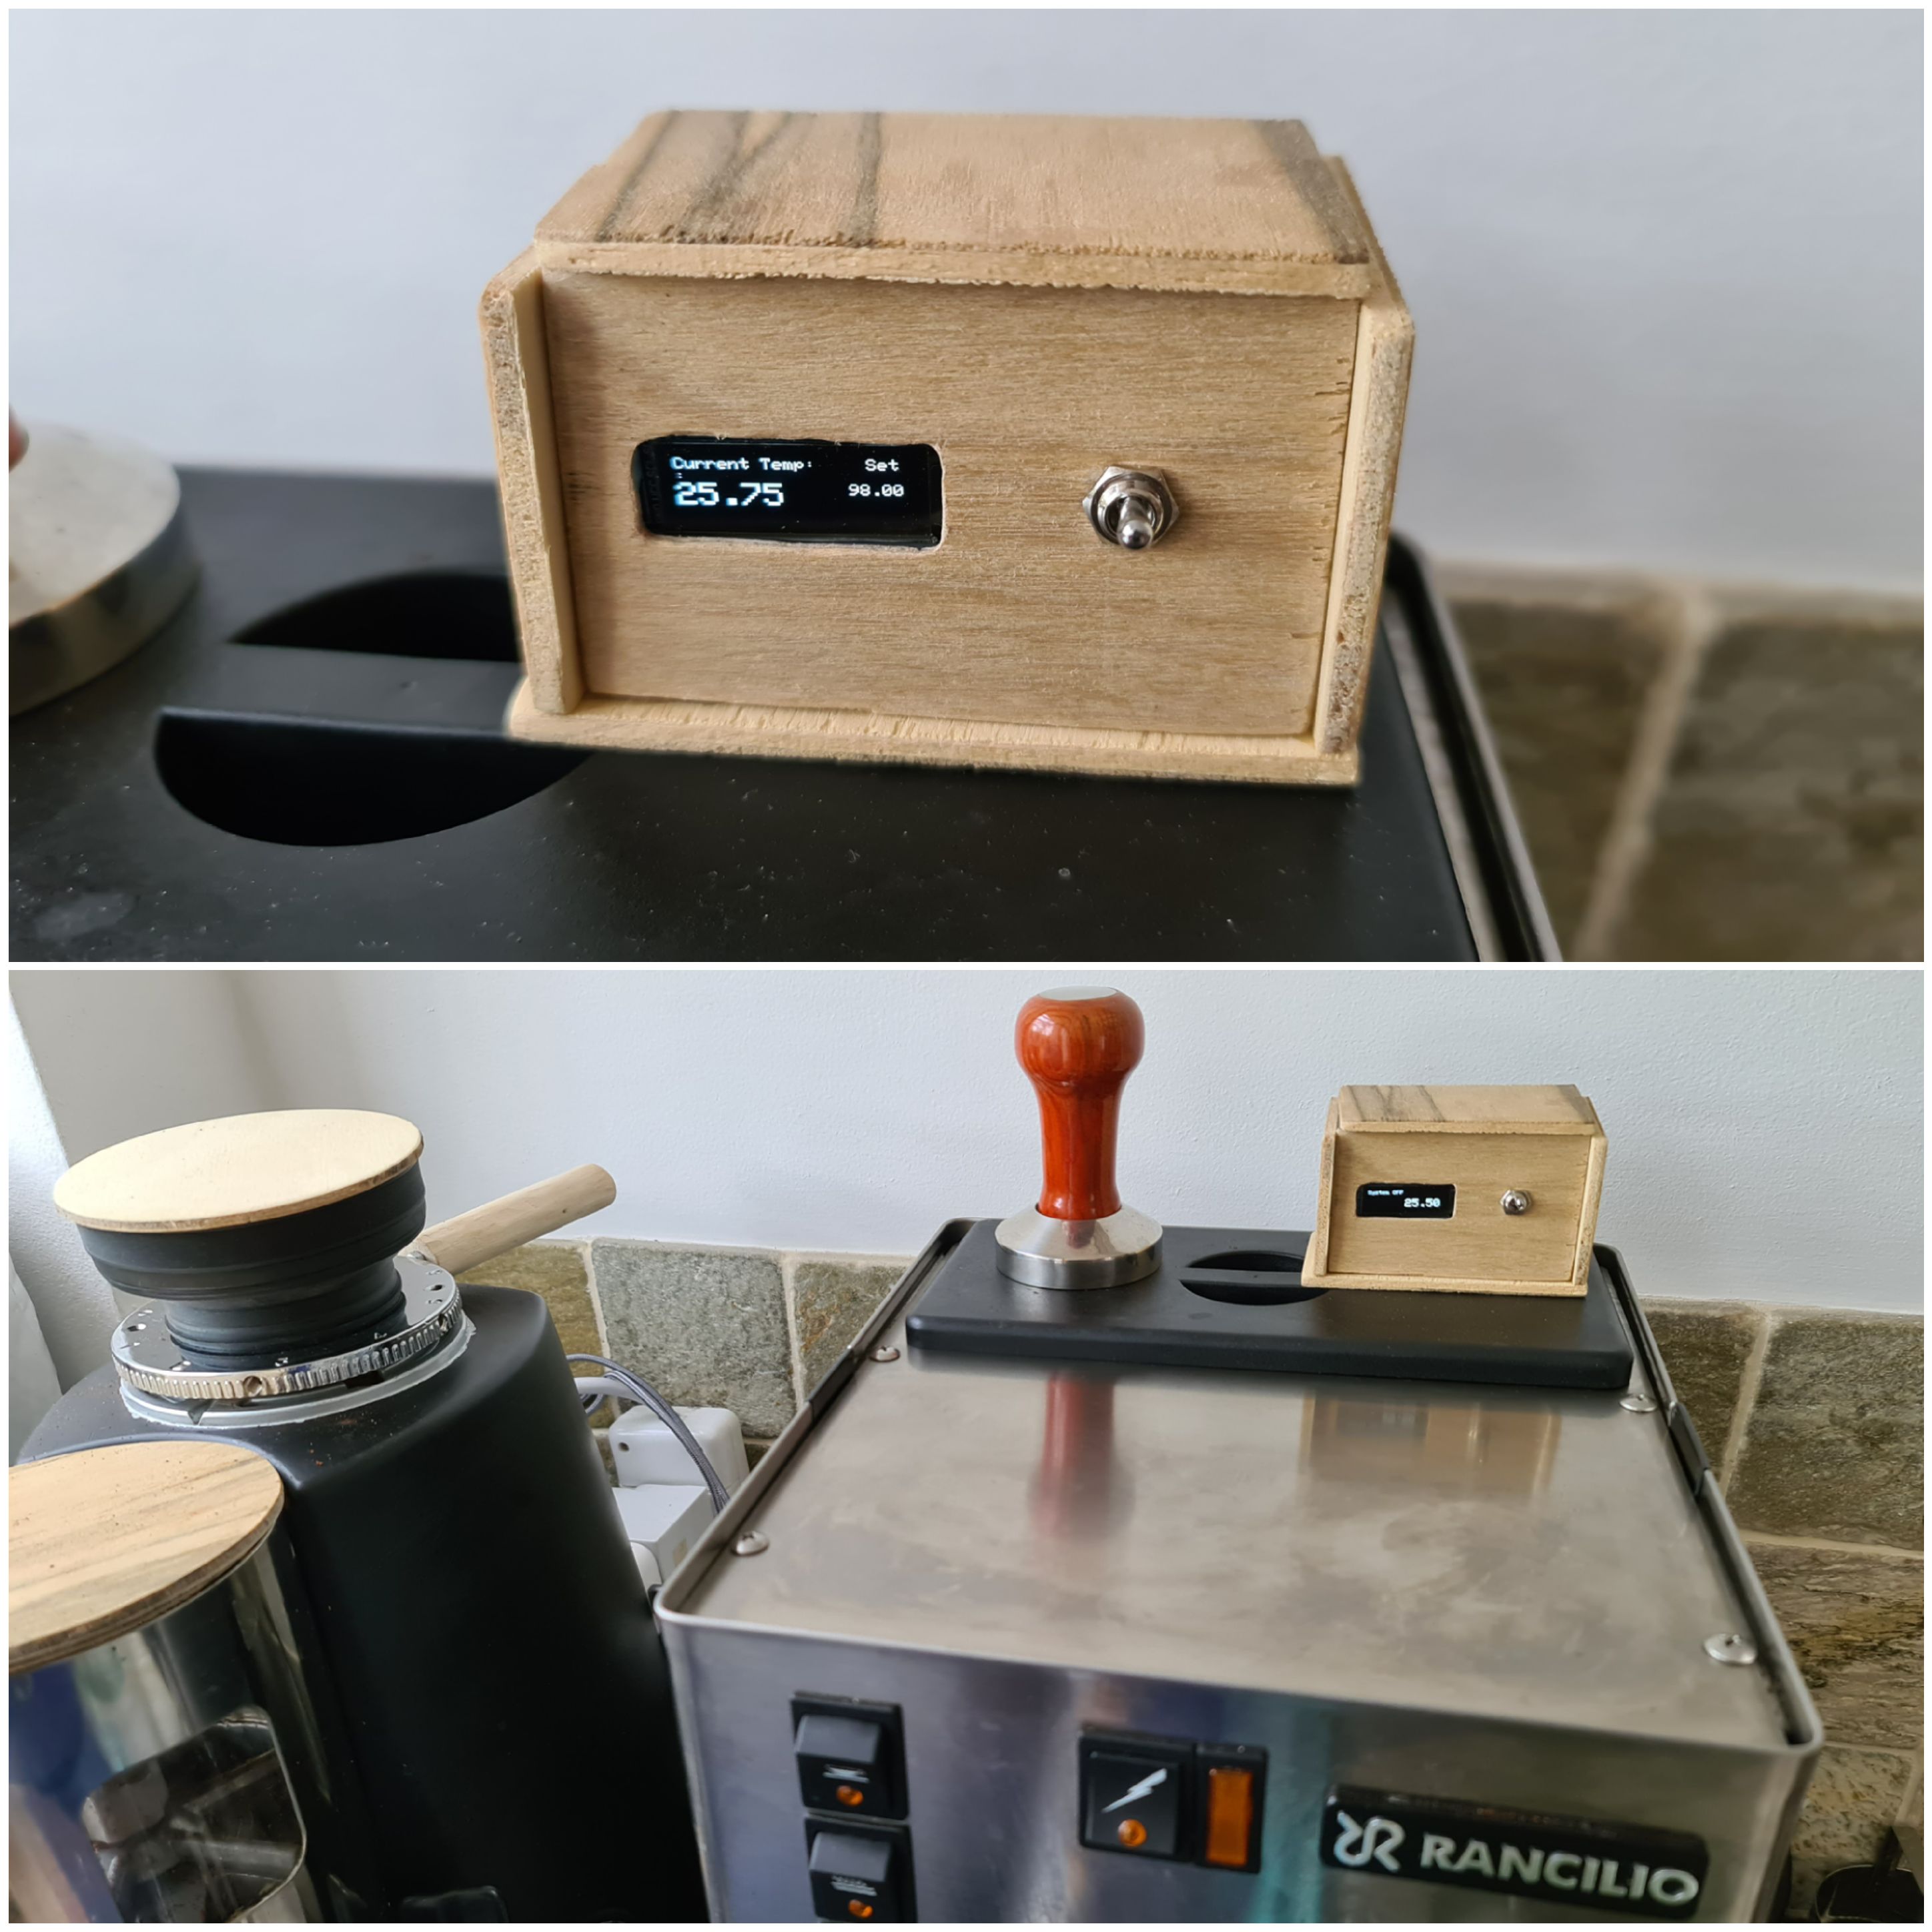
I apply shrink wrap to the thermocouple and relay wires to make a single cable that ran to the ESP8266, and I finished it off by adding an OLED screen so I could see the boiler temperature in realtime and putting the whole thing in a very rough wooden box.
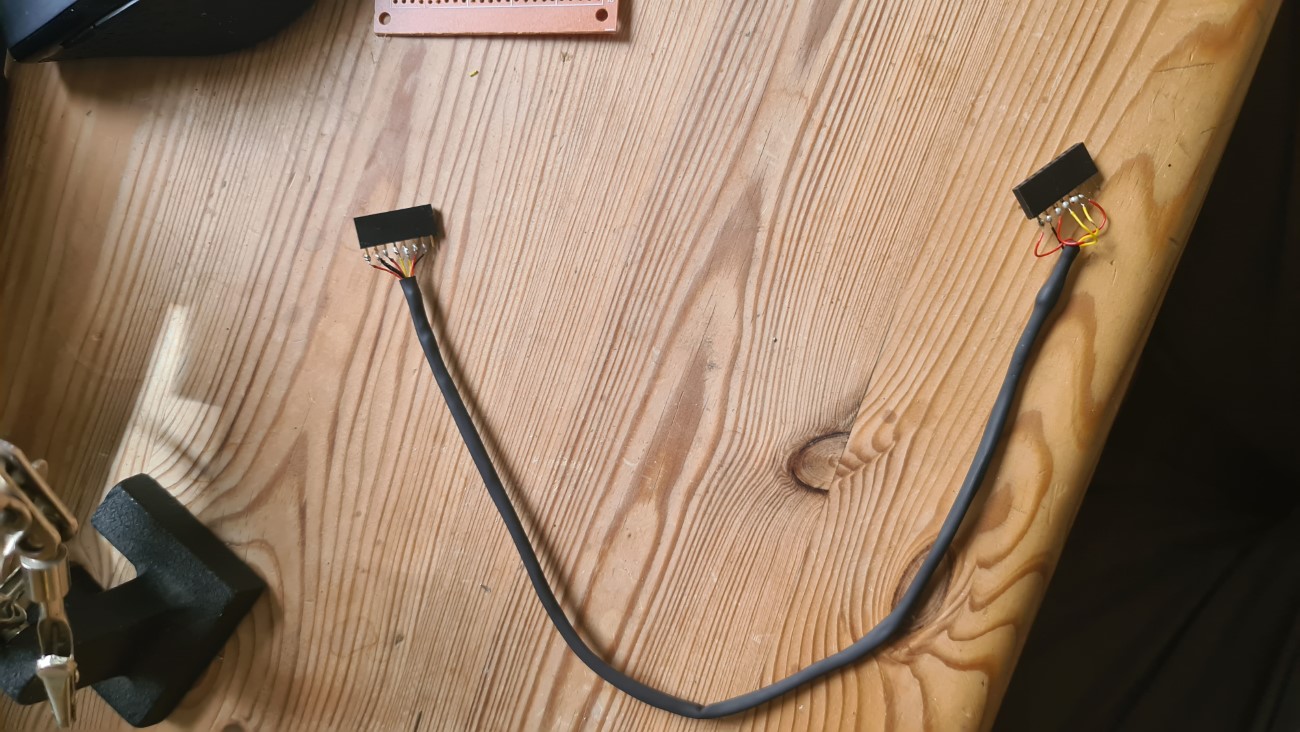 Custom wire carrying the relay 3.3V signals and the connectors to the MAX6675 thermocouple amplifier
Coding
I’ve put the code here.
I started with the arduino PID library that many people seem to use when building a C-based PID controller. I used a few of the links still alive on this Arduino page for people who have tried this in the past, although a lot of it is now inactive.
I’ve added in OLED functions for publishing data to the screen wired into the ESP, displaying the status of the coffee machine, whether the PID or thermostat (manual control) controller is being used, and the current temperature of the boiler.
This is straightforward to interface with in that you can just feed it your setpoint and current value as well as tune it with the values you want to use for the P, I and D. It then returns the output which I used as a proportion of 1 second for how long the heater should be on for.
The microcontroller can then just call on the PID every second to update the value (although I ran temperature readings to the PID as fast as possible to reduce any lag in error calculation).
When the machine is turned on cold, it starts the PID with a huge error which can take a while for the iterations to correct for, so I put in an extra loop similar to the basic thermostat above that does an initial ramping of temperature up to about 90 before it starts polling the PID code.
I added the option for the whole system to run in either PID mode or thermostat mode. This proved useful for struggling with tuning the PID values, as I could just switch it to thermostat and it would just run the heater when needed to oscillate around a set point. I should stress here that using a basic thermostat code with the thermocouple and relay provided a huge improvement of temperature stability over the stock thermostat. So you may well want to build this thing and not bother with the PID at all.
Finally, I added instances in Node Red to read subscribe to the temperature readings of the boiler (and push to InfluxDB & Grafana) and be able to publish an ‘on’ and ‘off’ command. This allows me to schedule the coffee machine to start heating at a certain time each day, as well as plug into Google assistant (via the excellent NORA project) to respond to ‘hey Google, turn the coffee on’.
Closing
The system is a minimum viable product, in that it controls the heater better than the machine ever did itself, and I can set it to start pre-heating before I get up in the morning.
There are many projects out there adding lots of more functionality, including integrating a Raspberry Pi to take full control of the machine’s buttons and several commercial options available.
I think even if you just wire in the arduino as a basic thermostat you will get far more accurate temperature stability (~5°C around setpoint) than the stock thermostat. The PID layer is up to the user if they ultimately want to also minimise overshooting.